Saturday 29 December 2012

Tie wraps and gaffa tape

Had to tidy up the garage yesterday evening, spanners, screwdrivers, and other tools all over the place, spent more time looking for a 10mm spanner than tightening up the nut ! Found the missing drill bits, a good handful of rivets, and several washers. A good sweep of the floor also revealed other missing items !

So today, still in a "tidy up" mode decided to tie wrap the wiring to the rear of the car, also the fuel lines. Placed in-situ the fuse box, and ran the engine harness to approximate positions to the front of the car. These are taped in place with good old "Gaffa" tape until the exact position is known.


Fuel lines and wiring harness are protected past the diff and drive shafts by a short length of flexible plastic tubing.


Fuse box in-situ, as recommended by Simon at GBS, with the wires coming out via the top of the box.


All looking rather smart, the only concern is the closeness of the handbrake cable to the fuel lines, wiring and brake pipe ? hoping that when the rear of the car is nearly completed and the handbrake cable is connected that it should pull clear ?

Lastly today, wired up the low pressure fuel pump, this needed to have a 2 way connector fitting to it so that it could be plugged into the wiring harness. A simple job of crimping the wires into a couple of spade connectors. I have had mixed results with crimping in the past, so a small amount of solder was used just to be on the safe side, probably a little over the top, but at least I know the wires are not going to come out. Think I shall do this for all the crimping connections ?

Summary of build so far today...

Tie wrapping fuel lines and harness... 1 hr
Placing fuse box in situ... 0.5 hr
Placing engine harness in situ... 0.5 hr
Fuel pump connector and soldering... 0.5 hr

Total time today... 2.5 hrs

Total time of build...  24 hrs
total days since started... 33 days

Thursday 27 December 2012

Minus 6 and Christmas

The 2 week run up to Christmas saw little work on the Zero, a combination of cold weather, Christmas shopping, doing those little jobs round the house, and waiting for deliveries, and a lack of parts, meant I could not get stuck into the build. Added to the fact that the garage fell to minus 6 degrees with no heater made it not worth going in.

Present to myself... A heater, and some off cuts of carpet to stop the penetrating cold from the concrete floor rising through my feet and legs, plus a couple of trips to GBS for some parts. Saturday before Christmas GBS had a bit of an open day (Coffee and mince pies !) went along to pick up even more parts and a chat with a few builders, always good to get extra tips from other Zero owners, well the wife was working and the boys had gone out to their mates, so made myself useful !

Now that Christmas and Boxing day have past, the wife back at work, and my boys out for the day round the sales, time to get back on the Zero build.

Brake pipes the order of this morning, I had already bolted in place the master cylinder so it was just the case of routing the pipe work from the cylinder to the 4 corners of the car. First was the single rear pipe to the 4 way union, then the 2 smaller lines to each side of the rear. the 2 front pipes where then routed around the frame to each front side.


The firewall is just placed with a clip, just as a guide to make sure pipes and wiring etc where clear. 

Quick break, now this afternoon, swirl pot and high pressure fuel pump...

Swirl Pot fitted, very simple, downloaded the instructions from the "Kit spares" website, then the high pressure pump fitted, all plumbed in.


A rather productive day, now just thinking what to do tomorrow ?

Summary of build and times...

Brakepipes... 3 hrs
Swirl pot bracket... 0.5 hr
Swirl pot... 0.5 hr
High pressure fuel pump... 0.5 hr
Plumbing in fuel lines... 1 hr

Total time today 5.5 hrs

Total overall time... 21.5 hrs
Total days since start... 31 days

Sunday 25 November 2012

Black sticky stuff and rubber gloves

Week 2 and phoned GBS to see if any of my back order items where in stock yet, and yes a few ! more important was the "black sticky bond stuff" was in stock, Jumped into the car, along with the bent bolts from last week and headed over to the factory. As usual when I arrived was offered a cuppa.... always goes down well ! This time Will sorted me out in the stores, swapped the bolts for straight ones, got 3 tubes of the black bond, a couple of brake discs and pads and 2 ball ends. While I was there a quick visit into the workshop to make sure I was doing things right, Craig spent a good 30 minutes going through the next stage of the the build with me, with another few good tips. Unfortunately for me I have to take part of the rear wishbone assembly apart to get a couple of washers in, This can be an IVA fail, so better to sort it out now instead of later which would involve more work.

So back to the build, time to bond and rivet the rear seat panel on, already drilled and temporary in place from last week, Alex and myself removed the panel and put a good bead of bond around the frame and over the rivet holes, its really a 2 man job to make it easy, and a couple of minutes later the panel was back in place, stuck to the bond, located about a dozen rivets around the panel to make sure it was in the right place and started riveting. 15 minutes later, one back seat panel in place and riveted. Clamps placed on the 2 side parts as I was unable to get a drill in for rivets, but this black bonding stuff is pretty strong anyway, give it overnight to cure.


Now onto the front foot well panels, drilled, bonded and riveted.


Alex riveting, learning new skills every weekend !


Time for a break, and F1 qualifying is on. Also give time for the bond to go off, got about 40 to 60 minute working time with the bond and anywhere between 24 and 48 hours curing time.
 
Top tip... When using the black bonding sticky stuff, use rubber gloves, or something similar, its taken several washes with a good hand cleanser, 2 showers, and a scrub with white spirit to try and get it off my hands and its still not off !!
 
Managed to get it in my hair as well, and on my clothes... bloody stuff gets everywhere !
 
The side foot well panels need a bit of bending so in the "Workmate" Alex clamped the panel and gave it a bend. first time, and a perfect fit !
Before we set this panel in with bond and rivets, we'll put the gearbox mount in while we have space to work round, a bit of trimming with the angle grinder and 4 holes drilled and its in place centrally.


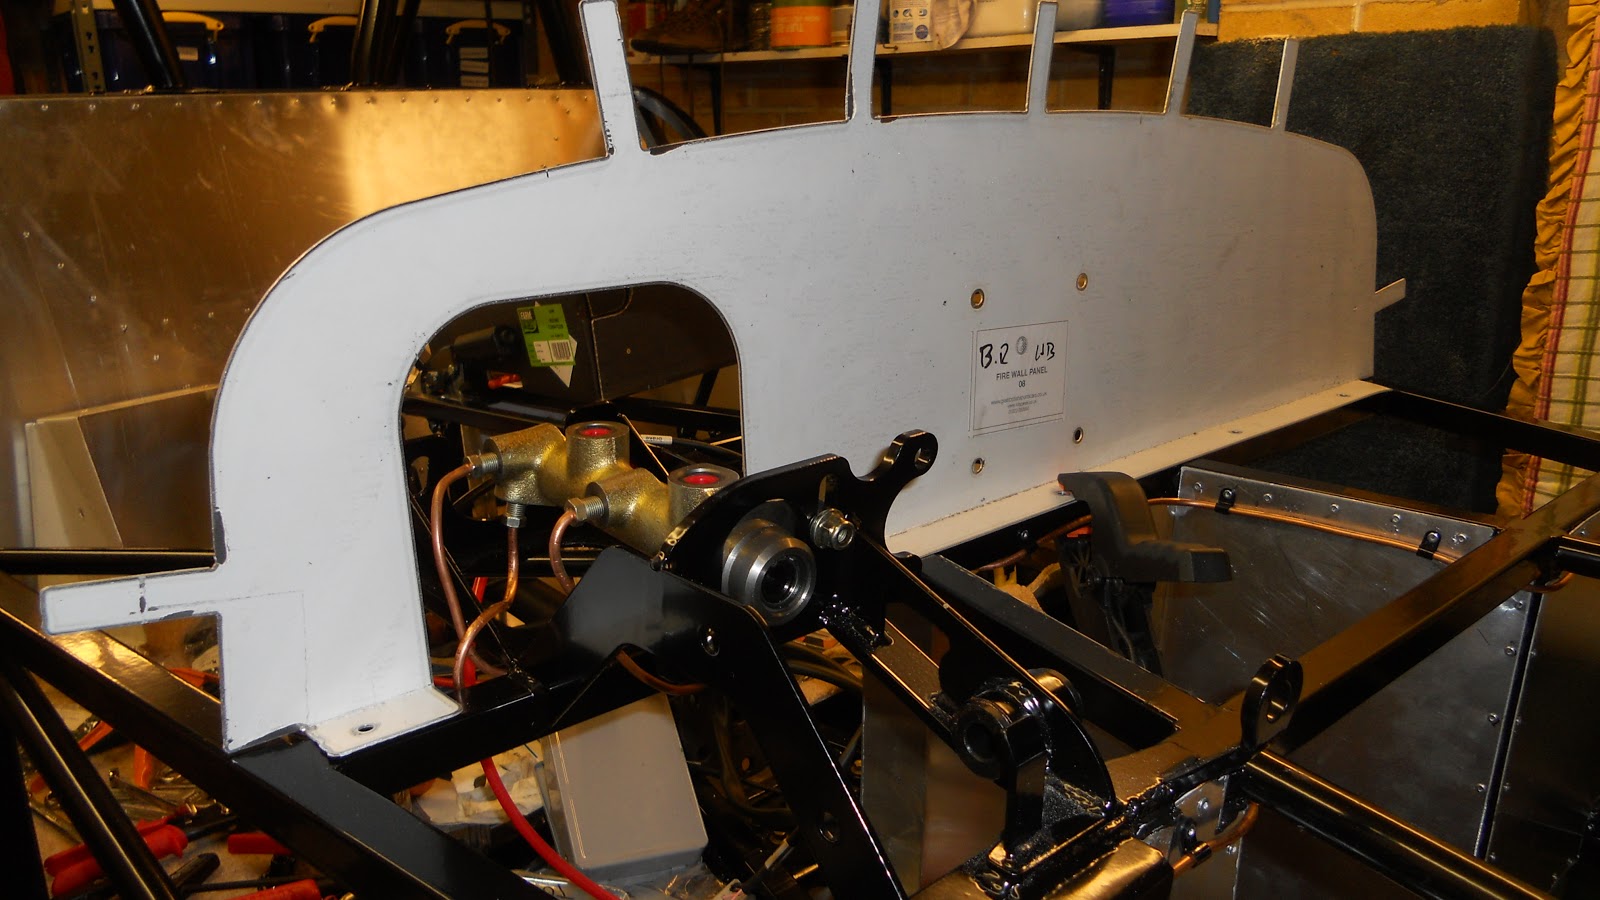
The wiring loom was also placed in an approximate position, screwed to a piece of wood and clamped to where it will be placed on the scuttle (give or take a few Cm's). Brake master cylinder was also bolted in place ready for the brake lines.


Every time I seem to bend over the frame, reach for something, or even walk past it, I catch the "black sticky stuff" its getting everywhere, so I'm going to stop for a while and go and watch the last race of the F1 series.
 
 Build so far this week,
Rear seat panel finished... 1 hr
Front foot wells, bond and rivets... 3 hrs (2hrs with Alex)
Wiring loom... 0.5hrs
Gearbox mount, trimmed and drilled... 1 hr
master cylinder... 0.25 hr
Scrubbing time...1 hr and still not got the black stuff off !
Total time this week... 6 hrs

Total build time 19 hours
days so far 16


Sunday 18 November 2012

Rear Wishbones and Handbrake

Not much work during the week, Wife working away, boys and house to look after, and my right arm playing up again, Hospital and Doctors appointments. Bit frustrating as this was an opportunity to lock myself away in the garage and knuckle down to some building without interruptions ? However time was spent doing some research, visiting GBS, and collecting more tools from a friend who has kindly lent me an air riveter, saving me time and effort with my arm.

Fitting the bushes into the rear wishbones... a very tight fit, used a bit of grease and a vice, 28 bushes later... time for a cuppa.

Crush tubes for rear wishbones... fitting same as the bushes... 14 tubes later... another cuppa !!

Trial fit of the upper rear wishbones highlighted a small problem, the bolts supplied seem to be about 5mm to long, and are hitting the frame, Spoke to GBS and they say they should be OK, could pack out with a few washers ? or cut off 5mm of the bolt, tried packing with washers... looks ugly ! so too the grinder and just took off 5mm, redressed with a 10mm die and it now looks "spot on" still with 2 to 3 threads passed the nylock nut.


This only applied to the upper rear front bolts, the bolt for the back of the upper rear was fine and needed no adjustment, photo shows bolt before trimming.

Found fitting the wishbones with the washers very tight, Spoke to Ben at GBS and said to try and get the washers in if I can, If I can see light between the bushes and the brackets then it needs a washer, don't want any "play" in the wishbone setup. A couple of washers where very tight but a small screwdriver and a small "tapping stick" made sure no light was showing.

So rear wishbones all lightly bolted up, not tightening fully, just in case things have to come off, Rear dampers and springs fitted and again lightly bolted up, also rear hub carriers fitted to upper wishbones.

Problem 2 ?? while trying to fit the lower rear wishbone to the hub carrier I seem to have bent the long bolt ? only very slightly, can't see the bend, only when I try and fit it I find a tight spot, and on the flat kitchen surface when I roll the bolt you can feel the bend, must only be a fraction of a mm, but its there. So I'll leave that till I get a replacement from GBS on next weeks visit.


 While working at the rear, and I've got the bits to install the handbrake, only 2 nuts and bolts, and a couple of grommet's. Only 30 minutes, 20 of them putting the grommet's in !


That's it today, going for my roast dinner !

So times for the build so far...
Installing the bushes in the wishbones,  3 hrs
fitting crush tubes, 0.5 hr
Fitting wishbones, 2 hrs
Adjusting bolts 0.5 hr
Dampers and springs 0.5 hr
Handbrake 0.5 hr
Total this blog 7 Hours

Total for build... 13 Hours
Days from Start... 9


Monday 12 November 2012

Picking up the kit

D-Day has finally arrived ! Time to pick up the kit. A short 20 minute drive over to GBS on Friday afternoon, thinking it would only take an hour or so to put everything in the van ended up being just over 3 hours ? This was simply that I had to check every item onto the van and sign it off, and that included every nut, bolt, washer, tie-wrap, panel, engine, etc, plus having instructions from Ben at GBS on how things went together and which items to do first. Unfortunately a few items were out of stock, most due in the next week or so, but I've got plenty of work to do with what I've got already.

Organised a couple of mates to help unload the van on my return, may thanks to the 2 Steve's for the help, only took 20 minutes to unload and stack in the garage !


All in by 7:30pm.

Busy Saturday, so nothing started on the Zero today, had to get a couple of tools from Machine Mart which I had forgotten to get last week, unfortunately the staff at the shop are lacking the information and know how on the simplest tools, a very frustrating morning explaining what a "Deburring" tool was and the difference between UNF and UNC.... 3 members of staff didn't have a clue ??

So Sunday, time to get started, Listening to GBS, Back seat panel one of the first things to go in, so measured up, drilled and fixed with temporary rivets. The bonding compound (the black sticky stuff) was one of the items out of stock till next week, so not finished yet, just held in place with temporary rivet's.


TOP TIP : to get the back seat panel in, bend the panel in the middle forming an arc, then drop in the sides. easy with an extra pair of hands and not scraping the powder coating !

Next was to get the steering column bush kit in place, Ben from GBS said "it is a bast**d to get in", and he wasn't wrong !! Fairy liquid everywhere, and even bubbles coming out of my mouth !


Now to get the boys involved ? Using a 7/16" UNF tap, removing the powder coating from the seat belt harness anchor points.


Thanks boys ! while they where doing that job, I was looking at the next item, the fuel filter, pump, and mounting plate. A first for me, using Rivnuts. Marked out the holes and started drilling, inserted the Rivnuts and set with tool. A Slight mistake... 2 Rivnuts 1mm out when lined up with the holes ? as James would say " Oh Cock" ! Simple fix, just make the holes a little large in the plate, as seen in the photo.


 Time for tea, So far total build time 6 hours.

Saturday 3 November 2012

One step closer to D-Day !

The Zero frame has just come off the jig... off to the powder coaters now.
Estimated delivery time now next Friday, will have conformation next Wednesday ?


Photos from GBS.


Since the last blog the Motorbike and the boys quad bike have been sold, bit sad to see them go but they are doing nothing sat in the garage, and the space is needed. As a good friend said " A fast £10 is better that a slow £20" !


So the last few preparations to the garage have been completed this morning. Compressed air feed to the garage; simple case of a new air line through the garage wall from the side workshop where the compressor lives, less noise and again more space in the garage. Quick release fittings on all air tools fitted this morning... well done Alex.

6 days and counting !

Friday 26 October 2012

Slow fortnight

Been a bit of a slow fortnight, half term break for the boys from school so mainly clearing up those little jobs which have been hanging around to do.

All those tools which I need have finally arrived, a riveter, engine hoist, rivnut tool, a torque wrench and some cobalt drill bits. Managed to get a couple of Sierra manual, 99p each off ebay, very good condition.
So just waiting for a phone call to say the starter kit is ready to be picked up, hopefully in the next couple of weeks ?

Sunday 14 October 2012

Garage ready.... well almost ?

A busy weekend last week, Alex helped me with the lights in the garage, now 3 fluorescent lights instead of one 60 watt bulb !

Got the outside PIR light working as well !

Now just to sell the boys 50cc quad bike, then we have room to build ? any offers ?

 
Its only been just over 2 weeks since the order was palced at GBS, but now want to get started ! how much longer ? ;-).

Friday 5 October 2012

Clearing the garage

Started clearing the garage, it was up to the rafters with stackable white boxes which after a good sort through where full of "crap" from a house move over a year ago. Why did I keep all this stuff ?

3 trips to the local council "dump" with a car full each time, managed to collar the local scrap-metal man as he drove past as there was an assortment of metal items building up outside the backdoor.

I can see the floor !! still not cleared everything, but it's a start. Going to put up some more lights this weekend, Alex is going to help me again, the arm is not good after using it this week and I am unable to life it past shoulder height. He's only 14 but a great help, I'll talk him through wiring up the lights.

Monday 1 October 2012

Zero ordered

Well the track day did it for me and my youngest, Alex.

A GBS Zero GT wide body ordered !

Delivery of the kit in 4 to 6 weeks

 Photo from GBS


Fingers crossed it should look like this, only in black and stainless steel.

Tools to get...

Rivet gun
Torque wrench
Cobalt drill bits
think I've got everything else ?

Prep...

Clear the garage !
Put up some more lights
Sell Motorbike ?
Sell the boys Quadbike, it's now too small for them, it'll suit kids 5 to 10 yrs... any offers ?

The beginning

My motorbiking days are over. After shattering my elbow it's now impossible to ride a bike, the pain is far to great. So still wanting the thrill of acceleration, and the wind in my hair I have decided to build a "7" style sports car with my 2 boys, Ben & Alex.

We have attended a kit car show, seen different style's, talked to several builders and visited most of the major manufacturers, and have nearly made our minds up which one to build.

A visit to the GBS factory on thier open day, and a test ride for Ben in thier demo car made the choice easy.... A GBS Zero would be the one. Then an invite to a track day at Blyton Park the next day would seal it.


Sat there waiting for the "green" light, with Kieth, one of the directors of GBS, he's going to show me what the Zero can do in "Standard" road spec.


Wow ! .... sold to the man with the black helmet !... now just to do the math and have a word with the accountant (the wife!)


Our Ben enjoying a test ride !