Monday, 22 April 2013

Seats and Carpet

Special order seats arrived at GBS last week, rushed over to pick them up... very nice !
They have been sat in the living room for a few days and look good to me, but unfortunately didn't look good to the wife ? think its time to fit them this weekend.

Going to "dry" fit the seats to the chassis before fitting the carpet, this does mean that the seats will have to go in and out a few times more, but If I make a mistake drilling through the carpet its going to look messy ? Its easier to drill without the carpet as well.
Firstly I put strips of masking tape on the chassis floor, as it is powder coated in "Black" then when I use my black marker pen it can be easily seen on the tape.
Next fixing the seat runners to the bottom of the seats... only 4 bolts on each seat. now offered the seats to the floor making sure the seats are in the furthest setting back, marked the holes, removed the seats and drilled the floor. fairly straight forward. Repeated for the other side. I did mark the seats to which sides I fitted them in as the holes for the runners could be slightly different.


Alex wanted to try out the seats.... brum brum brum !

Before the carpet goes in there is a little more drilling to do in the cockpit area. The tops of the transmission tunnel need to be bolted in, so the panels where placed in situ and drilled with a 3.2mm drill bit, then removed and drilled out to 9mm ready for some rivnuts, a total of 12, 6 each side. lastly drilled out 4 holes for the speedo sensor bracket, as these will be hidden by the carpet.

A good vacuum to remove all the swarf, and then a clean down with brake cleaner to remove any oil or grease from the panels.

The seats are back in the living room ! ?

The carpet I have chosen is laser cut to fit from GBS, along with the carpet there are two 1lt cans of contact adhesive.

There are a few words of warning...

1. Use the adhesive in a well ventilated area, I had the garage door open and still got a headache !

2. Use something like latex gloves, its very sticky stuff ! managed to get it on my hands and didn't know, only to find out when I put on some gardening gloves to move a fence panel which had been delivered at the same time as I was gluing, then after about 15 minutes had a panic when my hand got stuck in the glove !

3. Don't get it on the good side of the carpet... its a bastard to get off !

So started to get the carpet in, taking a brake ... got a headache ?


UPDATE....
 
Well the headache soon cleared once I left the garage, had a cuppa and found that I had some contact adhesive in my beard... OUCH, BIG OUCH it made me cry ! So another word of warning... Don't sniff the tin ?
Anyway after pulling out the glue from said beard, got back in the garage to finish off the tin of glue before it cures in the tin and is wasted. Transmission tunnel sides next, these are quite long and to be honest 2 pairs of hands would be better, just to stop the contact adhesive from touching the other carpet sections. Had a couple of touches, but the "sticky stuff remover" shorts it out.
Floor panels next, these fold round under the transmission tunnel side and under the rear seat panel and it's quite awkward, so decided just to glue the front edge, after a dry fit the carpet panel was tight in its space, and as the seats will be bolted down on this panel I hope that just the front edge glue will be sufficient.
lastly the back carpet panel. and the only one to be trimmed ! not much only 2mm from the sides and the same on the edges running down the transmission tunnel.


Time on build today 6 hours
 
Total build time 127 hours


Saturday, 20 April 2013

finishing off a few jobs left from yesterday

Seem to of knackered the elbow from yesterday, doesn't seem to want to work or move today. So just finishing off a few jobs that where left from yesterday, and a good tidy up again.


Fuel lines now connected.


Photo show handbrake and return fuel line tied to the wishbone with a piece of spare fuel pipe as a spacer.

Moving on to the cooling system, fitted and trimmed the hose's and just tightened the hose clamps enough to hold the hose's, will tighten fully later on when the radiator is fitted and everything looks like it's in the right place.


Yesterday we failed to find the small clips for the fuel lines, this morning I found a bag of them, so on they went, and tightened fully.


So today's build time... 4 hours

Total build time... 121 hours

Friday, 19 April 2013

Exhaust bracket, Alternator kit, water rail kit, and finishiing off the trottle bodies

Well time to get more bits onto the engine, my mate Simon came round this afternoon to give a hand, and as the weather has improved, less wind and higher temperatures made working in the garage more pleasurable.
Fitting the alternator was one job today, but in order to fit some of the kit the throttle bodies have to be removed, so while Simon cracked on with that job, I finished off the rear exhaust bracket.


Bolts not tightened up yet, as these will have to be removed shortly when the carpet is installed. I have decided to now drill all holes in the drivers and passengers sides before the carpet is glued in as I do not want metal swarf to get stuck in the fabric of the carpet, just means more work to clean it after ?

OK the alternator kit has an alternator, 4 brackets, an adjuster pulley, a belt, and a bag full of bolts, nuts, washers, spacers, and NO instructions ? So most of the time Simon and myself spent scratching our heads thinking where all the bits went ? This job should only take 30 to 40 minutes if you know where everything goes, but 2 hours later its done.


OK so now the alternator kit is on, back to the throttle bodies, these go straight back on, along with the TPS (throttle position sensor). Fairly straight forward until we hit a problem !!! Yes never as easy as we thought ? All tightened up and the plug for the TPS will not connect ? the top alternator bracket is in the way ? only by about 5 mm ? So off with the bracket and 2 minutes later after being attacked by the angle grinder the plug now fits !
Fitting the air filter again was straight forward, so while Simon carried on with that, I started to remove the old Ford cooling housing, and I wished I had removed this prior to fitting the engine in the chassis, the bolts were awkward, tight and nearly impossible to get a spanner near them. But 15 minutes later the 3 bolts where out.
The new housing has been powder coated, and feels a little "lumpy" so a quick sand down on a flat surface was required.


So while I fitted the new housing, Simon was progressing with the air filter...


Simon continued with a few other jobs on that side of the engine, Oil pressure sensor, Fuel regulator, and routing of the last few fuel lines. plus the breather filter.


Mean while on the other side I got the thermostat housing loosely fitted, as I am still waiting for some parts to arrive. Water rail and some hose's fitted as well.


Its 7pm and we have both run out of steam, temperature is now dropping so we are calling it a day !

Total time on this build today 2 x 5 hours

Total build time 117 hours

Thursday, 18 April 2013

All gears, Battery tray, and exhaust

After the last blog and fitting the quick shift assembly a small problem had arrised ? I could only selected 1st and 4th gear, coupled with that, while turning the back wheel while in 1st gear the engine seemed not to turn over ? Did I assemble the gearbox/clutch/release bearing correctly ? Lots of head scratching and a trip to GBS with a few questions... many thanks again to Simon, Craig, and Raff at GBS answered all questions so back to sort out my build.

1st issue... gear selection. When I fitted the quick shift, I did not realise there was an adjuster ? so a quick adjustment and now all 6 gears engage... few ! There is a screw on the bolt which moves the gear stick forwards and backwards with a locking nut, this was adjusted approx. 30mm outwards as seen in the photo.


2nd issue... engine turn over while in gear.
This time while in gear got a large spanner and turned over the engine via the large pulley on the engine... success ! the rear wheels moved, so its a big relief it all works. What we failed to do was in the first place was to move BOTH rear wheels in the same direction, basic mechanic's with the limited slip diff. Think the cold weather had got to my brain at the end of the day ?

Now back to the build.
Time to trim the "tabs" off the scuttle assembly, and pre pair for painting. Going with a satin black colour again to match the inside of the scuttle.


All the "tabs" now trimmed, and primer applied.
Primer also applied to the battery tray.
left overnight to cure, then 2 coats of satin black applied.


Battery tray in place, and battery holder riveted in with the battery strap. Battery size 063 fits perfectly and is one of the most popular so its a cheaper option.

Having looked at many completed builds at Blyton Park, found the logical place for the water expansion bottle location. Simply rivnuted in place with M6 pan head bolts.


had to this job before the exhaust is fitted, as the pipes cover the bottle.


For the past few weeks, I had a strip of "gaffa" tape covering the exhaust ports, when I took it off, it left a horrible sticky residue, as seen in the photo. 20 Min's later with "sticky stuff remover" it was all clean. Note to self... don't use Gaffa tape again ?


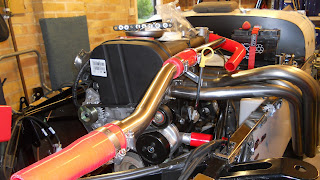
Exhaust manifold fitted, just a tiny adjustment to the dipstick pipe, all fitted rather nicely.

Fitted the silencer, needs a little "tweaking" to look straight but the side view... oh la la !


Just got to fit the end bracket... when I can find it ? I know I've got it ? somewhere ? and before my mate Simon asks... its not with the ham ! (long standing joke, bought some ham last year and miss placed it ? only to find it several weeks later in the freezer).


Time on this part of the build... 8 Hours.

Total build time 107 hours.

Monday, 1 April 2013

Blyton Park track day

The British weather seems to be stuck in winter and after only an hour in the garage yesterday, found my finger ends had lost their feelings from just picking up very cold spanners. So a quick tidy up was in order !

Need to get motivated ? if only it would get a bit warmer ? The forecast for the weekend is cold, dry, and sunny and luck would have it that GBS had organised a track day at Blyton Park, only 50 minutes away. packed the family car with loads of warm clothes, helmets, and camera's and off we set for a day out.


Ben was keen to go out as a passenger, and as he has just started driving lessons it was an opportunity for him to experience a bit of speed on the track...


Richard from GBS was out in the Race Zero, had to say it was the fastest car on the track !


So no work on my Zero this weekend, but had a fab time at Blyton Park watching and talking to other builders and owners.