Thursday 22 September 2016

MOT D-Day

As explained in an earlier blog my laptop has got some problems communicating with the ECU, for some reason its not recognizing the ECU ? Think the issue maybe down to the serial lead to USB interface not compatible with my new laptop, it worked with my previous laptop but that was running Windows 7. Anyway after spending several hours trying to get it to work I have bitten the bullet and handed the Zero over to GBS for the day to get it through the MOT test.

Richard at GBS spent about an hour setting up the ECU and lambda sensor to get the emissions correct for the MOT test, only configuring Map 1, so leaving Map 2 & 3 untouched.

Off to the MOT station ....


IT PASSED !


(better photo will replace this one after the weekend)


Would like to thank the team at GBS for getting the emissions correct for the MOT.


Just the road tax and insurance to sort out now ?


30 Months maintenance and pre MOT part 3

Although the title says 30 months, it actually is 34 months, the essential work has spread out over the last 4 months. 2 of these months because of building work, and the rest was just finding the time to do the work. Also after each day of working on the Zero I made sure it was back together and running ready for any run outs that may have arisen over the summer months.

While doing a nut and bolt inspection and my head inside the zero quite a bit I kept getting a slight whiff of petrol ? not all the time, and usually from the drivers side where all of the fuel lines and swirl pot are located. While driving an occasional smell as well ? but again not very often. Took a run over the GBS mainly to ask some questions on the ECU/map/emissions ready for the MOT test, as a few owners have had some problems with getting their Zero's through the test. Spoke to Richard and he gave me a few pointers to help me out, BUT on inspection of the Zero found what could be the petrol smell issue... Fuel lines ... all of them had surface cracking ? So another job, replace the fuel lines !

Richard also noticed that the wires to the temperature sensor where just touching the throttle linkage, so a tidy up of the wires required. (think a broken/missing ty-wrap is the culprit ?)

On the ECU/map/emissions side of things Richard recommended fitting a narrowband Lambda sensor. The wiring is there ready for it so shouldn't be hard ?

Back home after a rather frustrating search for a Lambda sensor ? 4 major auto parts suppliers in town where totally unhelpful in the lambda sensor area. All of them could not help because the make and model of the Zero is not listed and/or my registration number did not mach anything on their database... totally useless ! I was just asking for a universal 4 wire lambda sensor with an 18mm thread ? not hard you would think ?

So a 10 second search on Ebay turned up a selection of sensors, found one which hopefully is perfect, and its local, in my town, however no contact details available so just cannot go and pick one up, but its post free anyway, just got to wait.

Sensor arrived 2 days later, now to fit...

First thing is to remove the blanking plug from the exhaust, Richard said it could be a bit difficult, he was not wrong, abandoned day 1 of sensor fitting, now the garage smells of WD40 as I have the thread soaking over night.

Day 2 ... lets have another go at the removal of the sensor plug...


  As you can see from the photo my first attempt of removing the blanking plug, I have slightly rounded the hex insert ? think it was too much for the hex drive and a breaker bar. So next is the impact driver... success !


A quick clean with a wire brush around the threads before inserting the sensor


All went very quickly ? hope it works.


A 10mm hole was required for the sensor wires, as I was drilling through stainless steel I used a 4mm cobalt bit first, followed by a standard 10mm bit. Inserted a grommet to finish.


Wiring up the sensor to the loom was a simple case of removing a plug from the loom and crimping the wires together. The instructions that came with the sensor where as clear as mud ! so it took a bit of head scratching and google searching...

Lambda Sensor wire                                       GBS loom wire (Lambda sensor plug)

White (heater control)                                       Green
White (heater 12v)                                             Black
Grey (Signal ground)                                         Blue
Black (Signal)                                                    Red

Now onto replacing the fuel lines with new ones. While at GBS I picked up a couple of meters of new fuel line. Just cut to length and replace.


Photo shows new and old fuel lines.

TOP TIP... when replacing the fuel lines have an empty or part filled petrol can close by the fuel lines, its amazing how much fuel is in those hoses ! and it goes everywhere ! just pop the line into the can a save the petrol, instead of going all over the floor, my shirt, my jeans, down the side of the engine bay, etc.

Hopefully I've done all ready for its first MOT.


Fuel line x 2 meters  £9.60
Lambda sensor         £16.95


Saturday 10 September 2016

30 months after build and some maintenance Part 2

Getting the Zero ready for it's first MOT took a bit of a set back over the past 2 months, a small extension to the house halted progress as access to the garage was limited and lots of dust created from the builder meant it would have been an endless task to keep cleaning the garage every time we opened the doors to work on it. However we are nearly back on track.

Oil and filter changed, just a few miles before the 3000 miles since the last change.

Wiper motor

After a dry fit of the wiper motor, worm drive and 2 gear box's we plugged it in to check out the direction of the motor drive and the "Park" position of the blades. Just our luck ? the motor needs to come off and the internal gear needs to be turned to a different position. GBS/Kit spares have a step by step instruction sheet on how to do this .... Simple ... (until something goes "ping" and flies across the garage as we took the cover off ???)


What came off after several minutes of looking for it was the connecting rod and the "C" clip. Luckily we had the diagram on where it fits !

Apparently it's pot luck which way round the motor gear is assembled at the manufacturer, if you don't have to change the cam in the gear assembly then "DON'T" as it's a pain to do and can test your patients when your fingers are covered in grease.

So this took the best part of the morning, but back on and working the correct way, and the "parking" of the blade position is now correct.


Wiper  Arms and Blades

Now for the wiper Arms. These have to be shortened as the sweep over the screen is too great. These are just riveted in, so have to be drilled out to be shortened. Also so that the blades will fit correctly the fixing "lug" has to be drilled out as well. Then the whole arm has to be turned through 180 degrees so that the bent part of the arm points in the right direction for the blade to fit properly.
The wiper blade is then riveted back in place instead of using the "lug" and spring plate. Hopefully this is explained a little better with the photos below...


Before the dash goes back on a test to make sure it works ! and it does. But the blades are about 2 inch's to long, a quick cut with the dremel and sorted.

Last job before the dash goes back on is to make sure the washer jets are correct and no leaks... done.


Dash going back on...


Checked the lose bolt in the steering boss, turns out that the 1 bolt is 5mm too short and is shorter than all the others ? Didn't notice this when I first did it, however its a simple fix.

last simple fix today is the reversing lamp lens, a replacement purchased from Kit Spares.


Just the emissions map and nut and bolt inspection to sort out now, however time has run out today so hopefully next weeks job.


Maintenance time now 12 hours

Fully synthetic oil and filter £22
Reversing lens £5.62
Map switch from Emerald (plug and play) £18

Monday 13 June 2016

30 months after build and some maintenance

So its been 9 months since my last blog post, and 30 months since the Zero has been on the road. My first MOT is due in November and as the British summer has arrived with torrential rain and thunder storms with the forecast to remain the same for the rest of the week, thought it was time to go over a few issues with the Zero in the garage this week.

List as follows...

1. Fit wipers and motor ( been meaning to do this for a long time, but every time I try its been nice weather and my thinking was ...  don't need wipers today, and ending up going for a blat instead. )

2. Fix the ground issue. ( loose rivnut so not making ground all of the time)

3. Handbrake warning light ( take a look at the switch )

4. fit a map selector switch to the ECU, ready for emissions map and MOT

5. Rear fog light not working ( MOT )

6.  Replace reversing lens ( dropped heavy box on it while in the garage, needs a new one for MOT )

7. Oil and filter change

8. Replace a bolt in the steering wheel quick release boss. somehow its missing ?

9. Load emissions map into ECU and test before MOT

10. Nut and Bolt check across whole of the build, including visual inspection around all fluid areas.

11. Possible brake fluid replacement and bleed system, ( see how time goes ? could have to wait till another time ?)

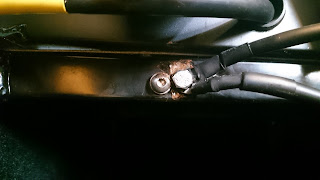
After a slow start to Sunday morning ( seriously heavy rain ! ) Alex and myself made it to the garage. Within no time we had the dash, centre console, transmission tunnel cover, and bonnet off. 1st job, fix the ground point, decided to drill a new hole all the way through the cross member running underneath where the ECU is situated, remove some of the powder coating and drop in a nut, bolt, and washers with some copper grease to hold the earth straps. This way we are not relying on just the friction of the rivnut to make contact with the ground, but a larger surface area of the washers to the chassis with the removal of the powder coating.

Picture shows... New earth/ground point, next too the dodgy rivnut setting. for some reason the bolt was just spinning inside the rivnut and would not come out, so we just left it in. The nut behind the new bolt is a nylock.


Plugged back in the dash loom for a quick check, and this time everything looked good with headlights on and off, which is how we noticed an earth problem in the first place. ( see early blog posts )

Now onto the handbrake warning light, for some reason 2 weeks ago the handbrake light would not go out after disengaging the handbrake ? then a couple of miles down the road it went out ? this was intermittent for the past 20 miles or so.
So with the transmission tunnel cover off we could get to the switch for further investigation. After a few minutes of testing with the multimeter we found the switch was working fine, and there was a signal from the switch to the loom and to the dash, also that the switch was working with the handbrake perfectly, but still the light was on ? .... Time to consult the wiring diagram.

After several minutes found the problem... written on the wiring diagram for the warning light it said "Handbrake warning light/brake fluid warning light" A quick check of the brake fluid reservoir found that it was a little low ? ... hence the intermittent light going on and off as we went round corners. Topped it up with approx 30ml of brake fluid and hay presto the light went out. Problem solved or is it ?  Where was the brake fluid disappearing too ?

After a check of the braking system we found the leak, a small amount of brake fluid was on the rear diff, and a feel around the brake pipe joint  above it showed it was coming from the brake light switch. This was "nipped up" about half a turn, we also cleaned up the leaked brake fluid and shall watch closely for any further leaks from this area.

With the centre console off we found a place for the "ECU map selector" switch, just a 10mm hole was needed, then to trim down the length of the stork so that the knob would fit flush. this job quick and easy.


Picture shows...  "ECU map selector" switch on the side of the centre console.


Fog light not working... removed the lens to check the lamp, all good, then Alex checked the spade connectors... one loose, tightened up, now lamp is working. Another quick fix.

Now for the wiper motor and under dash assembly. Basically a pain to fit ? the motor and assembly where on and off several times for measuring, cutting, fitting, and flaring of the protection tubes of the worm drive. This took a couple of hours in all, and hopefully worth it in the end. However I still need to double check the direction of the motor with another Zero before fitting the arm and blades. I had by accident fitted an arm to the spline top just to see how it assembled... wish I hadn't as it took forever to get apart and it was only a push fit ! If the direction of the worm drive and motor are wrong the whole thing has to come off, and the motor gear box has to be taken apart to turn over one of the cogs, before reassembly. Full instructions are given for this with the wiper motor, however I am hoping not to do this, as with my luck it'll never work again !... my brain is now fried, can't think straight.


Picture shows... Wiper gear heads, and screen wash jets in place...


Picture shows...  Wiper motor location, showing worm drive without protective tubing, 1st dry fitting of several !


That's it for today, time has got the better of us, so back on with the dash, and all the other panels, a tidy up and tools away. The Zero is road ready after these few jobs, but will continue with the list throughout this week.

More pictures to follow on the next update.

Tuesday 22 September 2015

GBS Factory Runout

Not updated my blog for about 3 months, so here's an update on whats been happening with the Zero...

Did a 500 mile Day trip with my son Alex from home to Wales to see family then back home the same day for supper ! She performed fantastic, no problems at all and returned a fuel consumption of 38.5 mpg.

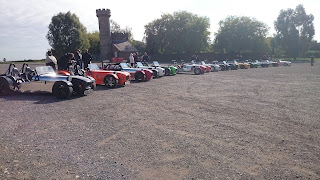
Then a GBS Factory run out. We all met at Donington Park at 10am and had a good drive through the countryside for 95 miles before ending up at a pub for a spot of food. A great day out with good company.

In between these, lots of little trips all over the place, also to a local classic/sports car meet every other Wednesday at a local pub, average attendance about 200 cars in the evening.

Now for some photos....


Enjoying every minute !

Thursday 4 June 2015

Day 2 of essential work... Overheating issues.

Now that the wife is happy she has somewhere to put her coffee on cold day run outs, I turn my focus to my overheating issues ?

Long story, but I'll condense it down... The Zero overheats for no apparent reason ? It can go for a few hundred miles and no problems, then a short 10 mile journey and she overheats, sometimes spitting coolant out from the expansion bottle all over the floor, or the temperature gauge reaches 110 degrees before the fan kicks in ?

I now carry a 2 litre bottle of water with me to top up when necessary.

So last week, after talking to countless friends, other Zero owners, and the factory I have identified 4 possible issues...

1) Got the plumbing of the expansion bottle the wrong way round ? Well in earlier blogs I had found I had plumbed it in wrong, but that is not an issue now.

2) No hole in the thermostat plate, took a look and there is one there.

3) Pressure cap not sealing properly... well the one that I got was a sample pressure cap from a supply company that GBS where looking at to supply them with caps when they ran out of stock ? Could this be the problem ? So I removed the cap and with a file "faced" off the top of the thermostat housing for a better seal a few months ago. Having returned to GBS last week, for the sake of a few pounds I purchased another cap, which they have been using now for 18 months and have had no reported issues. Fingers crossed.

4) Broken bracket on the water rail. For some unknown reason the bracket has snapped off the side of the water rail, leaving it floating in the air with just the hoses holding it in place. While at GBS I got a replacement one of these as well.


So all replaced and topped up with water.

Guess what... STILL OVERHEATING !  .... GGGRRRRRR.

 Put the Zero back in the garage and locked the door !

Next day 1am 

Woke up with a thought ! (wife not happy) anyway, it has just accrued to me that every time I topped up the coolant level over the passed year its just been with water, and have I diluted the antifreeze properties to the point that its not cooling efficiently ?

At the auto factors at 8am... Antifreeze purchased.

Time to drain the system, in order to reach the lowest point I've got to take the nose cone off, while doing this found another problem... The radiator fan fell off !

It is only held in place buy clipping into the radiator, but is this the reason for overheating ? anyway, a minute later its clipped back in.


Took the bottom coolant hose off the radiator and drained off. Basically the colour was clear, hardly a sign of antifreeze, just water. Hose fitted back on and topped up with 50/50 antifreeze/water.

Got the Zero warmed up, got to 98 degrees and the fan kicks in, cools it to about 95 degrees. It continues to do this for 4 cycles. Fingers crossed its seems to behaving its self !

Going to let it cool down and check for air locks, and repeat up to temperature again.

Oh the fun of owning a kitcar !

I now carry a bottle of 50/50 antifreeze/water in the car after this. Will update if it's a cure or back to the drawing board.


Back to the drawing board

Well spoke to GBS about the issue, because its frustrating not knowing the answer ?

Basically got to try different things one thing at a time to try and eliminate possible problems, so first, go for a run and get it up to temperature, then see when the gauge reads overheating (above 98) if the voltmeter also rises, to see if there is a problem with the rectifier in the alternator ?

Well got the temperature over 100 on the gauge; and the voltmeter is a steady 14v, and when driving remains  at 14v. Sat idling and voltmeter drops to 13.5v. At no point did volts go over 14.2v.

OK, so in the video below, I have found what could be another issue, while sat idling, watching the temperature rise, I turned off the side lights and saw the temperature gauge drop 10 degrees, also the oil pressure gauge did something similar ?


Will have a think about this... will update soon, hopefully with a solution !

OK found the problem.... Its a ground issue, found the offending connection under the dash on the passenger side. Looks like the rivnut is loose ? Simple repair though ?

Wednesday 3 June 2015

Essential upgrade

Been a while since I have updated my Zero build blog, been a bit busy enjoying driving it ! and had other projects and jobs to do. See my other blog page,,,

http://bills-2nd-arcade-machine.blogspot.co.uk/2015/04/upright-design.html    Some 20 odd posts !

So back to the Zero and an essential upgrade ...

It has been mentioned on several occasions that the Zero is lacking a "Cup holder" especially when going through a Costa Coffee drive thru ? So just for the wife, Alison, one has been fitted.

A neat folding one ...


Happy days !